58-Piece Electrical LOTO Kit with Padlocks & Station
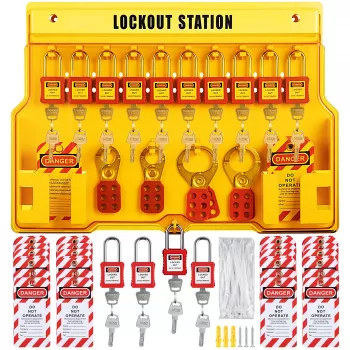
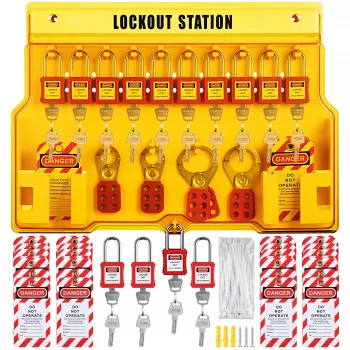
58-Piece Electrical Lockout Tagout Safety Kit with Padlocks & Station
Electrical maintenance and troubleshooting often happen under time pressure, around multiple energy sources, and across shared work areas. A well-organized lockout/tagout kit helps keep devices, padlocks, and tags in one place so isolation steps can be completed consistently, documented clearly, and verified before work begins. A station-based set also improves visibility—when locks, tags, and hardware are stored in a designated spot, teams can standardize how they control hazardous energy and reduce confusion during shift changes, breakdown calls, and contractor work.
What the kit is designed to do
- Centralize lockout/tagout components in a dedicated station to reduce time spent searching for devices.
- Support consistent control of hazardous electrical energy during servicing, maintenance, and commissioning tasks.
- Help teams coordinate multi-person or multi-point lockouts with padlocks, hasps, and clear tagging.
- Improve visibility of lockout status so affected employees can recognize equipment is isolated.
Typical components and how they’re used
- Safety padlocks: Assign to individuals so only the authorized person removes their lock.
- Lockout hasps: Enable multiple workers to apply their own locks to a single isolation point.
- Breaker lockout devices: Secure common breaker styles to prevent re-energizing during work.
- Tags and ties: Communicate who locked out the equipment, why, and when; attach securely to the device or lock.
- Station/storage: Keeps the set organized and ready for rapid deployment on the shop floor.
In day-to-day electrical work, the real value is repeatability. When the devices are staged the same way every time—padlocks in assigned positions, tags where they’re easy to reach, and breaker devices grouped by type—techs are more likely to follow the same sequence on every job, even when the pace ramps up.
Where a station-based set fits best
- Maintenance shops: Electricians share tools and need a single, visible lockout location.
- Production lines: Frequent changeovers and recurring breaker isolation benefit from a grab-and-go station.
- Facilities with contractors: A clear station reduces confusion about which devices are approved and available.
- Training environments: Makes it easier to demonstrate proper isolation, tagging, and verification steps.
Using the kit in a practical electrical lockout workflow
- Prepare: Identify all energy sources (main breaker, subpanels, control circuits, stored energy) and affected employees.
- Shut down: Follow normal stopping procedures before isolating power.
- Isolate: Apply the appropriate breaker lockout device and attach personal padlock(s).
- Tag: Complete the tag details (name, department/company, date/time, reason) and secure it to the lock/device.
- Verify: Attempt start or test for absence of voltage using approved procedures and instruments.
- Maintain control: Keep keys with the authorized employees; use hasps for group work.
- Restore: Remove tools, reinstall guards, notify affected employees, then remove locks/tags by the authorized personnel only.
For electrical tasks, verification is the hinge point: isolating a breaker is not the same as proving the circuit is de-energized. Many facilities align their workflow with recognized guidance such as OSHA 29 CFR 1910.147 and electrical safe work practices referenced in NFPA 70E.
Quick reference: matching common tasks to lockout devices
Use the table to map frequent electrical tasks to the devices typically needed, then stage those items at the front of the station for faster response.
| Task scenario | Primary isolation point | Devices commonly used | Notes for coordination |
|---|---|---|---|
| Troubleshooting a motor starter panel | Feeder breaker / disconnect | Breaker lockout device, personal padlock, tag | Verify absence of voltage before opening the enclosure |
| Replacing a circuit breaker in a subpanel | Upstream main breaker | Breaker lockout device, hasp (if multiple workers), padlocks, tags | Control all potential backfeed sources where applicable |
| Service on a production conveyor | Multiple control and power circuits | Multiple breaker lockouts, hasps, padlocks, tags | Document each isolation point; consider group lockout practices |
| Contractor work inside an MCC room | MCC bucket / feeder breaker | Breaker lockout device, padlock, tag | Clarify ownership of locks and removal authority before work begins |
What to look for when setting up a lockout station
- Accessibility: Place the station near maintenance areas but away from high-traffic damage zones.
- Standardization: Label storage positions so the same device is selected every time for the same breaker type.
- Accountability: Assign padlocks to individuals; keep spare tags and ties replenished.
- Durability: Choose components suited to the environment (dust, oils, outdoor exposure) and inspect routinely.
- Documentation alignment: Ensure tags and procedures match site policy and regulatory requirements.
Fit and compatibility considerations
Many sites also reference consensus standards such as ANSI/ASSP Z244.1 to support consistent hazardous energy control across departments and equipment types.
Product options in stock
- 58-Piece Electrical Lockout Tagout Safety Kit with Padlocks & Station ($71.01): A complete, station-based set designed for centralized storage and day-to-day electrical isolation tasks.
- Electric Adjustable Height Standing Desk with Dual Drawers and Mobile Casters ($518.32): Useful for setting up a dedicated area for permits, procedures, and job documentation near the maintenance office.
FAQ
Can multiple workers lock out the same breaker at the same time?
Yes. Use a lockout hasp so each authorized employee applies their own padlock, keeping individual control of removal. Follow your facility’s group lockout policy for coordination and verification.
What information should be written on a lockout tag?
Include the authorized employee’s name, date/time, the reason for the lockout, and a department or contact identifier. Keep it legible and consistent with site procedures so others can quickly understand status and ownership.
How often should lockout/tagout devices and stations be inspected?
Inspect routinely as part of normal use and perform periodic audits per facility policy. Remove damaged devices, restock tags/ties, and confirm station contents and procedures align with required periodic inspections.















Leave a comment